2013 EUSPEN Challenge: Oticon
Academia Section
- Awards & Publications
- Courses
- Design & Manufacture
- Euspen Challenge
- Kinematic Coupling
- Raptors Design
- Research
2.70 Precision Machine
Related Websites
Challenge
Design a means to replace 6mm batteries in hearing assist devices. Keeping in mind that the process needs to be simple enough that it can be done with limited dexterity and vision.
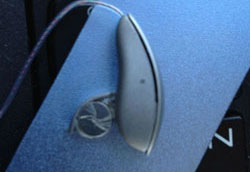
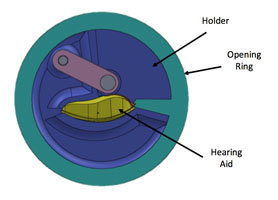
Left: Side view of Otticon hearing assist device with the gate open showing the 6mm diameter battery. Right: Top view of the hearing aid.
Background
In May/June 2013, my advisor asks me if I wanted to go to Europe for a design challenge. At which point, I asked about the topic of the challenge and he firmly replied "refresh your optics." Having no idea what was to come, I read over my engineering optics book and prepared for the challenge.
Competition
Functional Requirements
- Replace battery in hearing aid
Process: Open hearing aid, remove battery, add new battery, close hearing aid - Limited dexterity
- Limited visual guides
Design Parameters
- Limited size of hearing aid (Diameter 6 mm x Height 2mm)
- Replaced by someone with limited dexterity
- User with limited vision
- Only mechanical designs, no motors or electronics
Strategies
As soon as the announcement was made the first thing I did was to do my own assessment. This is part of the PREP process () where each team member does their own assessment of the project to come up with ideas and concepts without others involved. Doing work on your own at first helps in ensuring that that best ideas go forward during the peer review process. The second stage of the PREP process is peer review, but in order for that to happen other members of the team need to do the self assessment in order to make sure that no one idea dominates and that everyone has had a fair opportunity to design. The three startegies that I identified where: 1) fix hearing aid and process around it, 2) move hearing aid during the process, 3) combination. The one that I dentified as the most promissing is a combination of moving both hearing aid and tooling to make the change. Due to the small size of the hearing device and the limited dexterity, the approach that I found most favorable is to put the ear piece in a thermaformed part holder similar to the apple ear buds casing (like that shown in the reference section). In order proceed, I separated each process that needed to occur and put strategies for each section.
Open |
Remove Battery |
Add New Battery |
Close |
|---|---|---|---|
Friction |
Pin pusher |
Pin |
Latch |
Suction |
Gravity |
Gravity |
Push |
Wedge |
Wedge |
Manually |
Manually |
Independent Design
Details of the hearing aid device where limited. We were given one hearing aid per group, and two non-dimensioned drawings hardcopy only (one top view and one side view). From experience, I knew that no matter the design we needed to have the hearing aid in CAD form to be able to 3D print custom components. Overnight, I used a caliper in conjunction with the two drawings to create a CAD of the device. How was it done? I took a photo with my phone of the two drawings. I took the images and used Omax Layout to draw lines and splines on top of the images.The dxf file was then imported into Solidworks and started to create the CAD drawing. The drawing was scaled knowing the dimensions of the battery. What I produced in a period of four hours is a functional CAD that was used to find the pivot point, lever arm, and part envelope. To see an exceprt of my desing notebook click here.

Excerpt image from my notebook that shows the ear piece inside of a little box that where the hearing aid fits into and rotates as part of the disk.
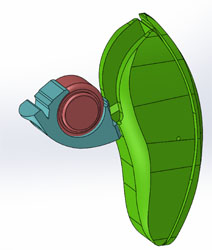

CAD that I produced overnight in order to find the pivot point and get shape of the hearing aid. Left: Solidworks CAD of hearing device. Right: motion of the battery holder showing the location of the pivot point.
Open Hearing Aid
The lowest resistance to opening the hearing aid is by inserting a little wedge between the rotating arm (holding the battery) and the housing. The arm rotates about a pivot point (identified with the CAD model).

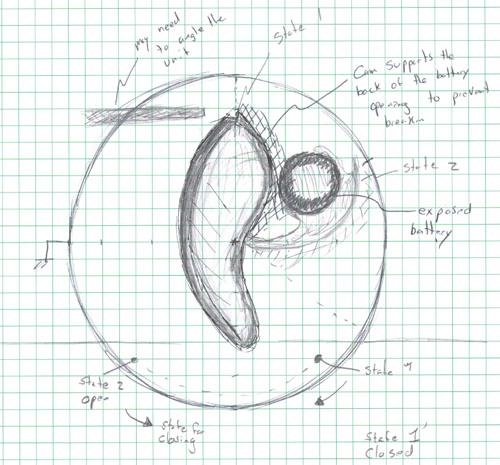
Schematic of opening of the hearing aid from my design notebook.
Remove Battery
The battery can only removed in one direction. Since we are not allowed to modify the hearing aid the direction of battery removal and insertion must be the same. Due to the geometry of the battery a wedge is not ideal. Using gravity to remove the battery is a viable option but does not necessarily help with the insertion of a new battery. Therefore, a pin seems to be the most viable option.
Add Fresh Battery
Since a pin is already being used to remove the old battery. Occam's Razor dictates (KISS) to keep it simple and use the same method of removal to do the insertion of the battery.
Close Hearing Aid
The process of closing the hearing aid can be done in several ways; however, one thing to consider is that if the user is to pick up the device then the battery may fall out if the device is not closed prior to removal. Therefore, the rotating arm needs to be closed in as part of the process.
Team Design for Prototype Only
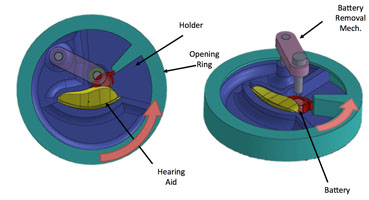
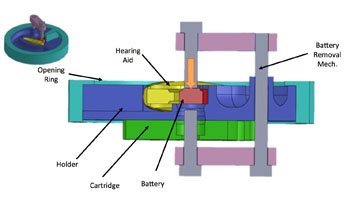
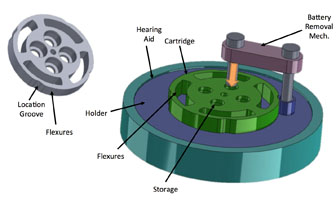
Why it's important to work in a team: peer review, the best ideas get incorporated together to create the best design possible, and brainstorming. In the team discussion several important things were discussed. We didn't want the user to interact with small latches or systems, so the whole operation should be consolidated to placing the hearing assist in the device and either by pushing motion or by a twisting motion the entire desing should be replace the battery. Due to the limited resources time and manufacturing facilities (3D printer). We decided to create a prototype Battery Replacement Device (BRD) that conveys the idea keeping in mind manufacturing feasibility and time.The BRD consists of a disk like system where the hearing aid clips inside, as shown below.
Excerpt from my design notebook the new design that instead of a box has the system in a cylinder disk like structure.
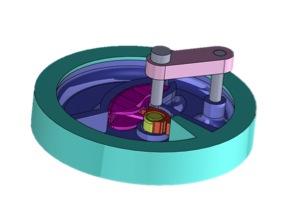
CAD image of the prototype design
Step 1: Open Hearing Aid
As a team we converged on opening the system with a wedge like system that clips on to the rotating arm. For symmetry I centered the pivot of the arm and made it concentric with the BRD. The first step that the user has to do is to load the device.
Step 1.1: Load Device ................................................................Step 1.2: Open by twisting opening ring
Step 2: Remove Battery
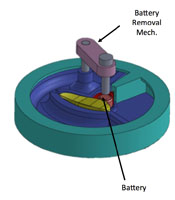
Although we wanted the BRD to operate in one motion, the manufacturing restrictions led us to give the user a guide rail that would allow us to replace the battery. Once in the open configuration the user has to move a pin up in order to remove the battery. David came up with the wonderful idea to use a revolver system to have multiple batteries. With the battery size and the possible configurations there are only four.
Step 2.1: Push Battery......................Step 2.2: Push battery down
Step 2.3: Battery at bottom section................................................................Step 2.4 Rotate Cartrige to remove
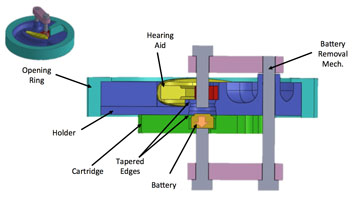

Step 3: Add Fresh Battery
Using the carosell design, as one battery is removed the fresh battery is added. With the new battery in place the battery displacement mechanism pushes a fresh battery into the hearing device.
Step 3.1: Push the new battery in place....................................................Step 3.2: Complete the loading

Step 4: Close Hearing Aid
In the same manner of openning the BRD, the closing of the lid is done by rotating the most exterior shell clockwise.
Step 4.1: Rotate clockwise to close the device

Other Features
Multiple batteries replacements and keeps old batteries.
Analysis
Identifying the appropriate analysis to perform. While there was much discussion in performing the analysis for a simple cantilver beam flexure within my team. The truth at the end of the day is: An engineer uses analysis to determine the limitations, dimension, etc of a feature; while a hacker can build one item and hope that it works based on experience. I was the one who lead the team to victory by incorporating the fabrication, cantilever analysis, scaling, and cost projections.
Power Analysis
While my team mates believed that no analysis was needed given the time restriction, I begged to differ. Therefore, I did a preliminary analysis to determine the efficiency of the unit based on the torque analysis.
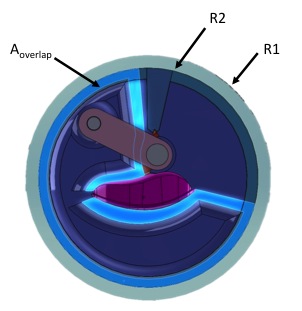
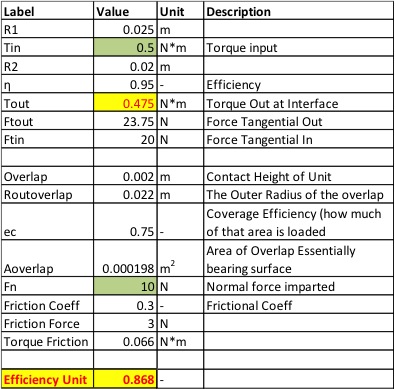
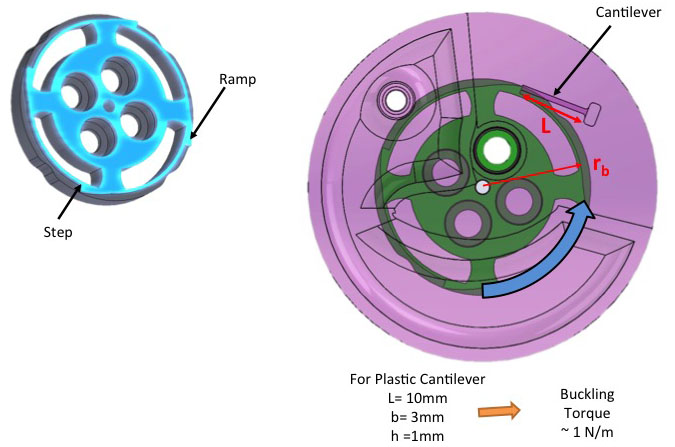
Ratchet Analysis
References
The inspiration for the primary holding mechanism is the apple ear buds case that holds the earbuds in place.

How to Succeed
Understand how the price of a product dominates the cost in manufacturing. Have a means to CAD something very quickly and make sure to bring a laptop and a lab notebook. Familiarize yourself with tools software like: ProE, Solidworks, MasterCAM, Excel, etc. Also understand manufacturing process and cost. How to design parts for injection molding, casting, millitng, turning, thermoforming, etc. Any good design will take into account limitation of the manufacturing process and cost. Also communication is key between team members. Phuc & David where wonderful to work with to get this done as a team. Thank you.
Recommendations to future students
- Use design notebooks!!!!!! HERE IS AN EXCERPT OF MY DESIGN NOTEBOOK FROM THE EUSPEN CHALLENGE.
- Do the back of the envelope calculation.
- Focus on the design of the product and how will it be manufactured.
- Think of scaling!
NEXT STEP
I have a working design to integrate all the elements to make a cheap ~$5.00 unit. I just have to finalize and fabricate.